The Basics
How do digital cameras work
Digital cameras work in exactly the same way as film cameras do. That means that light reflected from your object enters the lens and is focused on the focal plane of the camera. The main difference is that in the case of digital cameras, film has been replaced by a digital sensor. And what this means is that photons of light coming in through the lens will reach the sensor and produce electric current. This current will then be analysed by the camera to give the final image.
The images produced by digital cameras are composed of pixels (picture elements). Each pixel corresponds to a combination of primary colours (Red, Green and Blue). Therefore, a colour image consists of 3 channels, a Red, a Green and a Blue channel. It follows of course that the more pixels your image has the higher its resolution will be.
Resolution is one of the fundamental concepts in photography. It can be calculated by multiplying the number of pixels on the X axis by the number of pixels on the Y axis (width x height) of the image. For example, a photograph with an aspect ratio of 3:2 and 12 Mpixels of resolution has a pixel count of 4243 x 2828 pixels. A 6 Mpixels image has a resolution of 3000 x 2000 pixels.
One important aspect of image resolution is the bit depth. Bit stands for Binary Digit. Bits have a value of either 0 or 1. Bit depth refers to how many binary digits the tonal information for each pixel is stored in. For example, most black and white jpeg images produced are 8-bit ones. This means that for each bit value we have 28 or 256 possible tonal values ranging from 0 to 256. In the case of colour images where we have three colour channels (R, G, B), the images are actually 24-bit ones (8 bits per channel). Actually, it is this tonal distribution (blacks, shadows, midtones, whites, highlights etc.) we see in a histogram!
Types of cameras
There are many types of digital cameras like point-and-shoot, medium format, DSLR's etc. This guide, however, will only focus on the use of DSLR cameras and particularly the Canon EOS 6D and the Fuji Finepix S3 Pro.
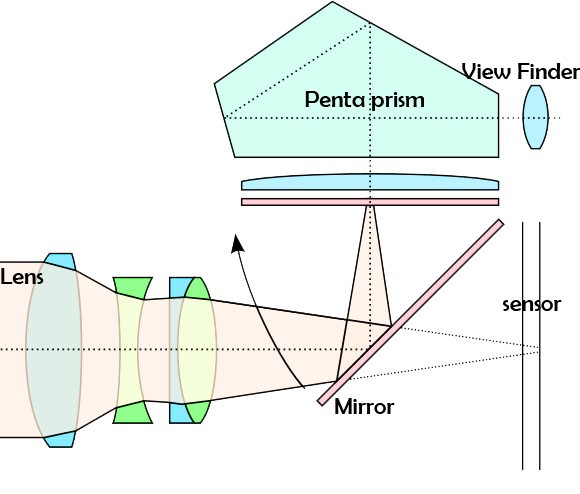
DSLR stands for Digital Single Lens Reflex. A DSLR camera is a type of camera that uses a mirror and a prism, so that the photographer can see exactly what will be captured. In a DSLR camera light enters through the lens and converges on the mirror which then sends the image to the prism and finally to your eye. When the shutter button is pressed, the mirror moves upwards and allows the light to hit the sensor.
Lenses
For the sake of simplicity and brevity, we will not be covering the whole range of lenses. That would be outside the scope of this guide. Instead, we will be talking about one type of lens, called a prime lens. Furthermore, we will be focusing on the use of a 35 mm one for the Fuji S3 Pro and a 50 mm one for the Canon 6D.
These lenses are called prime because they have a fixed focal length and essentially no zoom! Those mm values mentioned above correspond to the field of view projected on the camera sensor. But, the Fuji S3 Pro camera features a smaller APS-C sensor and the Canon 6D has a full frame sensor. What about the field of view in this case?
Well, because of its smaller sensor size, the field of view of the 35 mm lens on the Fuji S3 Pro is roughly 52 mm. Contrarily, because the Canon 6D features a full frame sensor, the field of view of the 50 mm Canon lens is actually 50 mm. In layman's terms, the S3 Pro can "see" even less than the Canon 6D even though it has a bigger focal length. This is one of the disadvantages of smaller sensor sizes.
Exposure
Exposure refers to the amount of light that strikes the film or sensor of the camera and is measured in stops. A difference of 1 stop actually refers to doubling or halving the exposure, e.g. going to 1/45th of a second from 1/90th of a second.
This is what the “Exposure Compensation” mode on the Canon EOS 6D actually does. In essence, the higher the exposure the more light will hit the film/sensor. The lower the exposure the less light will hit the film/sensor. You can see that exposure and light are proportionally related. The main factors that control exposure are the following:
- Film speed or film sensitivity in ISO. High ISO numbers mean higher sensitivity to light, i.e. higher exposure and more noise/grain in your images. You should be using ISO values from 50-200 in most cases but never go higher than ISO 200.
- Shutter speed. Shutter speed controls the amount of time that the aperture remains open to let light into the camera. High shutter speed settings e.g. 2 seconds, mean that the aperture will remain open for exactly 2 seconds. Low shutter speeds e.g. 1/60th of a second or 1/125th of a second mean that the aperture will remain open for less than a second. Note that doubling or halving the shutter speed corresponds to one stop in terms of exposure.
- Aperture value. Aperture is the hole in the diaphragm that regulates the amount of light entering the camera. Aperture values are measured in f stops. They are also directly related to Depth of Field (DoF), a property that refers to the range or distance in an image that appears sharp. In most cases an aperture value of f/8 (medium aperture) will give good sharpness and is highly recommended.
The “Av” mode on the Canon camera can be used to make things a lot simpler. For example, if we set the aperture Value to f/8, we can let the camera calculate the correct exposure time. In the case of the Fuji S3 Pro camera we can use the “M” mode and set the aperture to f/8. We can then turn the dial behind the shutter button to find the best shutter speed (exposure).

Colour temperature and white balance
The term colour temperature refers to the temperature of an ideal black body that emits light of similar hue to that of our light source. For example, when an iron rod heats up it slowly turns red and as it gets even hotter it turns blue. While this might seem counter-intuitive, as we tend to associate warmer colours to higher temperatures, in this case the bluer the light source the higher its colour temperature is. Wikipedia has an excellent article on colour temperature, which you are strongly encouraged to read.
White balance is a term related to colour temperature and it refers to how the camera perceives the colour temperature of the light source. What that means is that correct white balance settings help remove unrealistic colour casts from images. For example, an image taken under reflected visible light (~5500 K) should not appear yellow.
In essence your image should appear on screen and in print exactly as you see it with your eyes. After changing light sources, it is vital that you change the white balance settings on your camera, according to the temperature of each light source!
Histogram
Histograms are an extremely useful tool. What they do is display the distribution of tones as well as the quantity of pixels in a digital photograph. Remember to always consult your histograms! As a rule of thumb just keep in mind that a “balanced” histogram needs to have an equal distribution of tones and no clipped black or highlight areas.